Please follow these steps:
2 – Job Cost menu
16 – Job Cost Reports Menu
23 – Employee Labor Detail
Enter all desired parameters, dates, employees, etc.
Select desired format
4 – Job Employee, Date, Cost Center
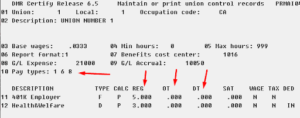
8 – Payroll Menu 2 – Other Maintenance Menu 9 – Maintain Union Deduction, Fringe Enter the employee’s union, local#, and occupation code Check item 10 Pay Types and check the list of fringes and deductions for a rate under the hourly types the employee was paid for
Please follow these steps:
Go to – 2 Job Cost Menu
Select – 13 Percent of comp.
Press enter for printer
Press enter for import
Enter posting period desired
Select – 5 Print statement update financials
Press enter for jobs to print
Enter “1” for print Rec Rev/Unbilled
Enter “C” for dollars and cents
Enter “N” for start dates greater than posting period
Enter “Y” for all ok
The over/under billing adjustments will be included in your financials
Please follow these steps:
Go to Menu item 52 – Restructure CSSI Database
Go to Menu item 9 – Populate HR Master from PR Master
Please follow these steps:
Go to – 2 Job Cost Menu
Select – 13 Percent of comp.
Depress enter for printer
Depress enter for import
Enter posting period desired
Select – 4 Print statement no update
Depress enter for jobs to print
Enter “1” for print Rec Rev/Unbilled
Enter “C” for dollars and cents
Enter “N” for start dates greater than posting period
Enter “Y” for all ok
File will be in local users area as JPERTXT.csv
Please follow these steps:
Go to – 1 General Ledger Menu
Select – 20 Export GL Data to Text File
Select – 3 Output Detail Range of posting periods
Depress enter for starting General Ledger number
Depress enter for ending General Ledger number
Enter first month/year for accounting year
Enter last month/year for accounting year
Enter “N” for bypass journal codes
Enter “Y” for all ok
File will be in local user area as GLDETAIL.csv
Please follow these steps:
to A/P control account even though invoices have been paid next year.
Go to 5 – Accounts Payable Menu
Select – 05 Cash Requirements
Select P for print
Select B for both
Depress enter for all due dates
Depress enter for by vendor
Enter ‘A’ for all vendors
Depress enter for account sequence
Enter thru posting period
Depress enter for include invoices paid in future months
Depress enter for print discounts only
Depress enter for report invoices on hold
Depress enter 2 times for print distributions
Enter “Y” for all ok
Please follow these steps:
Select – 2 Job Cost Menu
Select – 16 Job Cost Reports Menu
Select – 25 Cost Status Current Yr
Select – 1 Cost Status Report
Enter posting period
Enter “Y” for print income
Enter “N” for print suspended jobs only
Enter “Y” for all ok
Enter “Y” for all jobs and suspended jobs
Enter “N” for all others
Enter “Y” for all ok
Please follow these steps:
5 – Accounts Payable Menu
16 – Print Payment Register
2-Subcontractor Vendors Only
Enter Through posting period date (mmyy)
Enter start payment date (mmddyy)
Enter End Payment date (mmddyy)
Choose whether you want to itemize invoices
Choose to include GL/eqp distributions (y/n)
Select specific craft code. hit enter for all
Print jobs on separate pages (y/n)
Answer questions on jobs
Please follow these steps:
Go to 9 – Accounts Receivable Menu
Select – 04 Print Age Analysis
Enter thru period to age
Enter 1 Age by invoice date
Enter “N” to print zero balance invoices
Enter “N” to print non-active
Enter “Y” to print retainage
Depress enter for start range of dates
Enter range of dates for ageing
Make sure last enter is 9999
Enter 1 printout by customer
Enter 1 or 2 for sequence option
Enter “Y” or “N” for detail option
Enter “P” age by posting period
CSV file will be located in your local user area as araging.csv
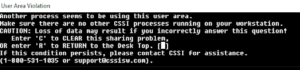
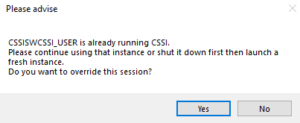
Depending on your version, you may be greeted by one of these messages when opening CSSI CAPS:
Version 6.5 and earlier:
Version 7.0:
Version 7.1 and later:
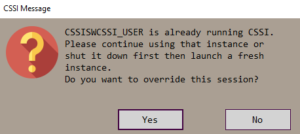
Typically, this message is caused because the application was terminated without going through it’s proper shutdown procedure. Power loss or using Task Manager to End Task are two common ways this happens. Often, though, there is an existing instance that should be used. In the latter case, proceeding may cause unpredictable behavior if both instances are simultaneously in use.
To clear the flag and allow the program to continue initializing the user session:
Version 6.5: Type ‘C’ for “clear”
Version 7.0 and 7.1: Click “Yes” or type ‘Y’
To stop this instance from opening and return to the existing session:
Version 6.5: Type ‘R’ for “return”
Version 7.0 and 7.1: Click “No” or type ‘N’
In some scenarios, postings will leave the General Ledger out of balance. You’ll be alerted to this condition in the System Balance Report (SBR) with a line like this:
![]()
In order to find the issue, follow these steps to print out the GL transactions and let the system point out entries that were out of balance.
- Go to 1 – General Ledger Menu
- Select 13 – Print Trans. (Balancing aid)
- Enter the posting period from the SBR
- Enter 99 to indicate all journal entry types should be checked
- Answer Y when asked if the system should only output out of balance codes. This will restrict the output to batches that were entered out of balance.
- Answer Y to run the report.
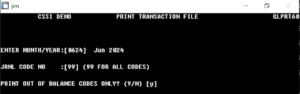
The report will then show all batches that had out of balance entries for that month and point you in the direction of the out of balance condition.
This is almost always because the End of Year Payroll operation hasn’t run yet. This process takes the data from the current payroll data and copies it off to the side for the 4th quarter analysis and reporting while you continue your day to day operations in the new year.
To perform this process, after the last payroll has run for the year, simply:
- Go to 42 – End of Calendar Year
- Select 8 – Payroll End of Year (RUN ONCE!)
- Answer whether you’d like to keep terminated employee data or not (we recommend you do for posterity’s sake)
- Once ready, say Yes to execute the process and your 4th quarter values should be available in the 4th quarter menu.
When this is encountered, a payroll history report should be run for the specific employee for the current year to date. The totals should be compared and matched to the history report.
If the totals already match, the problem may lie in the deductions. When an employee stops taking a deduction, their record should simply change the “AMT. OR %” of that deduction to 0 rather than deleting the deduction from the list that they’re taking. Check the payroll history report for the deduction totals and match those to the employee’s record. If there are any discrepancies, again, set the employee record to match the history report. If a deduction is missing, simply add it back in with the “AMT. OR %” set to 0 and the Accrued set to the total listed on the history report.
To run a Payroll History Report:
- Go to 8 – Payroll Menu
- Select 4 – Payroll Reports
- Then select 8 – Payroll History Report
- 1 – Print history report
- 1 – Report on a specific employee
- Enter date range for the report, keeping in mind that the weekending date will likely be in the previous calendar year for the first check written in this calendar year
- N – Do not print only certain occupation codes
- D/S – Either detail or summary will work, but detail can confirm that the date range encompasses all checks and only checks from the current year. Summary will be a more concise report.
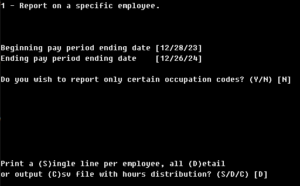
- Select the employee(s) you wish to report and hit ‘.’ when you’re finished.
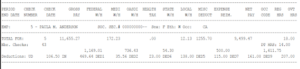
You’ll get the totals at the end of either the detail or summary report like this
- Go to 9 – Accounts Receivable Menu
- Select 1 – Maintenance Menu
- Then select 1 – Customer file
- 2 – Change
- Leave the customer number blank and hit enter
- You’ll be prompted with a message confirming you want to enter the settings area for accounts receivable. Click Yes.
- Enter any number from 7 to 12 to choose the slot you’d like to add the account to
- Enter the GL account number for the Asset account you wish to use
- Say Y to confirm the changes
- Go to 5 – Accounts Payable Menu
- Select 50 – Installation Options
- Choose 1 – Accounts Payable General
- N – To move to the settings, and hit Enter until you’re at the position you wish to add the new account to
- Enter the GL number and continue to hit Enter until you’ve reached the bottom and are prompted to save the settings
- On the way down, you’ll have the option to allow users to manually enter an account number of their choosing if the one they want isn’t listed. This should be activated with care as it will remove significant process control from the system
- Say Y to confirm the changes
Please see the ACA 1094/1095 Form Generation document for details.
Since 2020, when the IRS released their new W-4, CSSI has advised that all new employees and employees changing their withholding should have their withholding set using that format which uses option 5 in the selection of Fixed W/H flags. For information on setting these up, please see the document at (New W4 Instructions)
However, for historical reference, the flags are set as follows:
0 – Withhold only the calculated amount
1 – Withhold the greater of calculated amount or fixed amount
2 – WIthhold both the calculated amount and the fixed amount
3 – Withhold the fixed amount only
4 – Withhold the fixed amount as a percentage of gross only
5 – Use the new 2020 W-4 settings (an additional window will pop up)
Options 1, 3, and 4 are only available in the Conversion Menu (option 45 from the main menu) as there is significant risk of liability if the calculated value is not used.